|
This is my first ever Dance Cover MV. It's to BTS newest song "Permission to Dance". I really enjoy this song for how upbeat it is. It's got such a great message and even incorporates sign language. I love how BTS is breaking so many barriers such as language (English - Dynamite and Butter), (Japanese - Film Out), but also in style of dance such as contemporary (Black Swan), and Jazz (Still With You). It's a very easy dance and doesn't take very long to learn and is for everyone who loves to move and groove.
0 Comments
 Tried my hand at paper cutting for the first time. After 1 hr of cutting, this was the end product.
Things that I learned: - Positive cut out result should look like a painting. Negative cut outs should look like a carving. This one is positive. - Use a sharp scalpel to cut. The blade should be replaced if too much pressure is being used to cut or paper starting to pull and cuts are not clean. - Use a cutting board. Scratches and holes will close when wiped with damp cloth. - Always start from the centre and work outwards. Do the small pieces first. Rotate the paper and always cut towards you. - The end result is always flipped over so you are always cutting the backside. It's that time of year again where the sound of wedding bells are in the year. This summer I have 3 friends getting married. Though the ceremony and banquet didn't turn out as expected, that doesn't stop us from being creative with our presents. Comment below if you want to see more projects like these. I also recently created an amino account @MengzhenHao3. If you like what I post, please follow me there.
I designed this wedding card for my friends Josh and Tana as a present a couple weeks back. I wanted it to have an elegant pearly theme to it but not entirely white cause I knew the card stock background would be white so we went with a tan and white gradient. Overall I am super thrilled with the end product. The pearl flowers really stand out among the green leaves and yet don't overpower the two hearts in the background. The green leaves also adds a nice variety of colour. The ribbon strip works well with the theme with the two gold strips along the side. The thing I did differently with this card that usually was, instead of using two layers with the flowers resting on top of the first layer layer, this time to give it more depth, I placed some of the flowers on the first layer and bent them so that the petals sat on the second layer. It's much more difficult to glue down because the petals are not attached onto a flat surface but it also provides much more depth. Things that I would have improved upon would have been not to use so much glue on the ribbon strip. Because I used liquid glue, it caused the paper to bend a little. I also originally made the design too large despite planning it ahead of time on the cork board. Often "less is more" for cards that you want a clean and elegant finish. I would love to hear your feedback. I have also created an amino account @MengzhenHao3 if you want to follow me and see more of my artwork there. I do a lot of paper crafts on my blog so I wanted to try something new. A friend of mine really loves Diamond Painting and so I decided to give it a try. For those that don't know or have never tried Diamond painting before, it's very similar to paint by number but with diamond pieces instead.
I bought a picture of a night sky with two kids looking up at the stars. Unfortunately, I bought the 30cm x 40cm size set and so the picture turned out more pixelated than I had first anticipated but I'm still pretty satisfied with the overall product though next time I may have gone for a larger size. The overall cost was about $25CAD. It came with about 4 tools and a package of diamonds. I found the overall process quite relaxing. It's a great craft for de-stressing after a long day of work. Just put on an audiobook or a favourite playlist and away you go. I worked on mine over a period of about 3 weeks off-and-on while listening to Chronicles of Narnia by C.S. Lewis, which is one of my favourite childhood books. I documented my progress as I went along. I did find that the sticky paper could easily get dirty so I had to be careful to make sure to always cover it with the protective film after I worked. I did had a lot of little diamond pieces left over which I might use on another project. What I found helpful was putting a sample of each diamond colour next to legend so that if I accidentally forgot which package it came from, I'd still be able to quickly identify it. Another thing that was helpful was working under a bright light. It makes the symbols easier to read and also easier to identify the different shades of diamonds. After I was done, I did find the durability of the sticky paper to be questionable and did not think it would last over a prolonged period of time. The picture also had a sticky border around it where small fibres or hairs would also get stuck. I used some Mod Podge I recently bought from Amazon to coat it with a protective top coat and fill in any of the gaps between the diamonds. I used the Gloss version so that the diamonds could still give off that nice shine. The first picture (#1) is the completed product with gloss finish while the last picture is the product without gloss (#11). If you want to find a fun and creative way to relax, I would give diamond painting a try. This is my most recent design for July 2020. I made this card for my sister's birthday. Her favourite colour is pink. What do you guys think? Leave your thoughts in the comments below.
It was pretty fun to design and work with various layers of paper to give it that nice full pink gradient. My favourite part was the roses. I really love making roses. Once again, the hardest part is always layering the papers so you can see each individual strip and it doesn't get all clumped together. I thought the layered wings underneath the large flower was a nice touch. I also attached a picture of the designing stage. Originally there was going to be 3 flowers but unfortunately after starting to put the pieces on, I realized that the card would look to clustered and all the flowers would ultimately take up too much room so I had to limit it to one. The overall process took about 2 evenings. I was listening to the Series of Unfortunate Events as I worked. I'm up to about book 8 in the series. If you have any suggestions on what to make next, please place your suggestions in the comment section below. I recently just designed this quilled card for my best friends birthday and this is what it looks like. What do you guys think? I would love to hear your feedback or suggestions on what to make next! I'm also currently taking commissions and thinking of setting up at Etsy shop so I can possibly sell them online. Please let me know your thoughts in the comment section below.
My favourite part of this card is the ribbon strip that is along the side. The little gold edging goes well with the card I think. The most difficult part was the leaves because the inside and outside had to be different lengths and at different curvatures so they wouldn't overlap each other. I included a picture of the process I used to make the pieces for the card. You can see how I have everything pinned on a cork board before I glue it onto card stock paper paper. I traced the size of the paper onto the cork board to make sure everything fit when I finally glued it down. The process took about 2 evenings to complete but I think the end product turned out really nice. I also recently just acquired some Mod Podge from Amazon, which for those that are unfamiliar with the product, is a type of top coat glue so that the pieces will stay in place and give it a clean finish. It can also be used as just regular glue. I will have to do some experimenting to see how I can use it so it doesn't form large globs on the fine edges of the quilling paper but that will be a post for another day. I also am thinking of possibly experimenting with spray top coat finish just as a comparison.
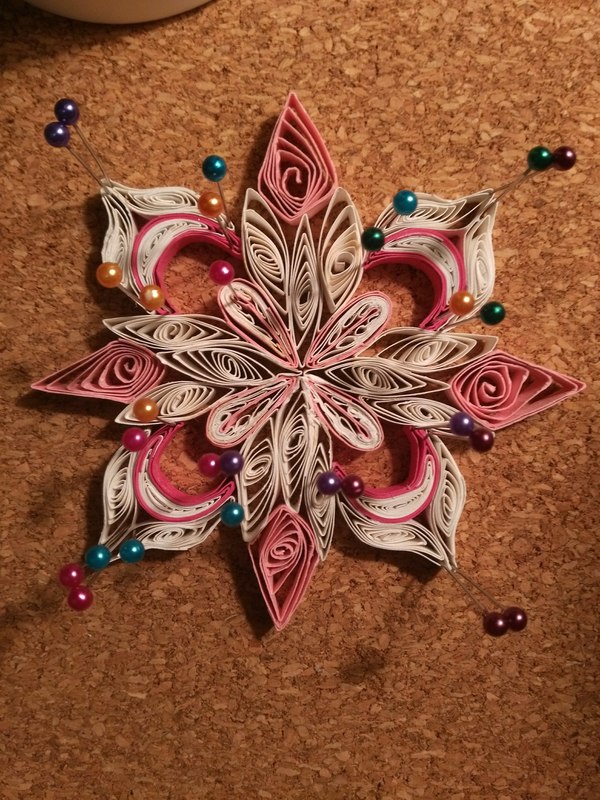
It's been a white since I've blogged anything but I'm back now that school's over. Here's quilling project #2. This one turned out quite nice. I originally took the design from Pinterest but added my own variation. It took me about 2hrs. I probably could have taken less time if I wasn't watching Haikyuu at the the same time :P. If you enjoy paper crafts and have nothing to do, or something to test your skill, this is the perfect project for you. It's a little harder than the first one with the bordering and double coloured paper but beautiful results.
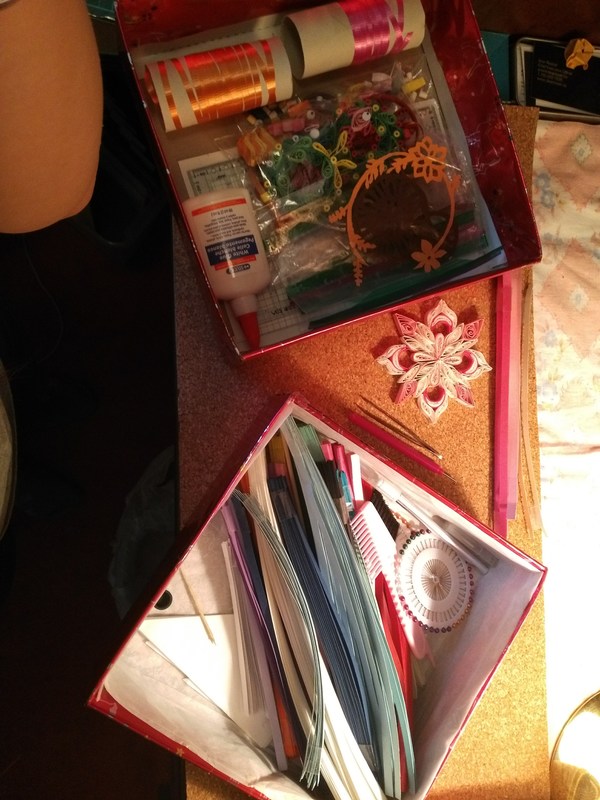
I finally started getting some proper supplies so my quilling is slowly getting faster. I bought a kit from Amazon for $30 with all the quilling tools it. I haven't had a chance to try them all yet but I hope to soon. The pink and white centre part was the hardest. I used a comb to layer it but I found an easier way for next time. It looks symmetrical in this photo but if you turn it, it's a little lop sided. If anyone has any idea of a glaze or sheen I could use as a finishing touch to stiffen and reinforce the paper, please let me know. Tips: - Instead of a comb, use tri coloured paper (pink, white, pink) or create the outer rim already and make the centre piece to fit the border. (https://www.pinterest.ca/pin/151433606196629483/) - Better and cleaner results with white glue than hot glue gun. It takes a little bit longer but definitely worth it. - Make sure to put enough glue to hold but not too much glue. If you don't have enough, place a small about on top of the paper and take a pin to slide it in and coat the sides. Wipe your pin afterwards so it doesn't get all sticky. - Have a damp cloth beside you to wipe hands and pins if need be when things get a little messy. - Use grid paper underneath so your end project is symmetrical. Even if the shapes are the same size, the position and spacing matters too. - A corkboard and a cloth underneath is a perfect surface to pin on without scratching your table surface - If it sticks to your work surface, take an exacto-knife and slowly loosen it. And that's it, off you go. 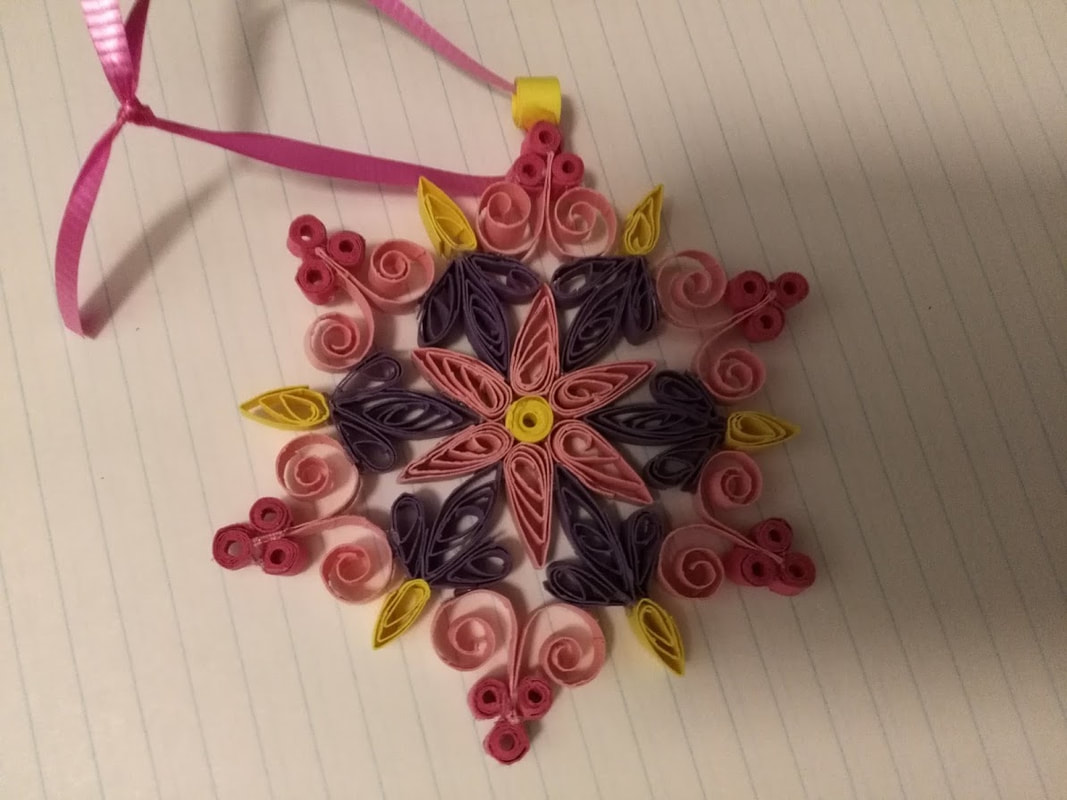 As the Christmas season comes near and you're struggling for present ideas, I found this is on Pinterest and thought this would be a cool personalized present for my friends. So I decided to try my hand at quilling. I think for a tree ornament, it turned out quite well for my first try. Total time spent was about 2hrs. It's a good way to kill time especially if you're a multi-tasker like me and can't stay still. I enjoyed it a lot. If I wasn't watching Naruto Shippuden or Netflix movies, I probably would have finished a lot earlier. I gave this to one of my mom's friends and she loved it. Maybe I could make a business out of it, if it didn't take me so long. Pinterest has a lot of different designs I really want to try. During my next break, I'll try and tackle some of the harder ones.
Here are some tips: - To hold the quilling paper in shape, I'd suggest using sewing pins. - It's better to use a cork board or something thick to put pins through to hold paper in place (optional). - Card stock paper that is a little stiff but still bendable is best. The width should be 0.5" for the best result. You could also use a paper shredder to save time. - Use a shape mold ruler so that your pieces stay the same size. - If you use white glue, it takes 30-45 seconds to dry so you will have to hold it in place or pin it. (not through the paper but to clasp it between two pins). The end result is much more clean and often stronger, but it's harder to get at the little cracks sometimes, so use a cue tip. - If you use a hot glue gun, it will dry faster (approximately 2-3 seconds) so you have to be prepared and move fast, but it will be a bit more messy since you can see the plastic at the seems, and often might break, if not glued properly. |
AuthorWrite something about yourself. No need to be fancy, just an overview. Archives
August 2021
Categories |
 RSS Feed
